
More than ever before, technology is becoming a staple tool to support education across the entire curriculum. After a year of remote learning, it certainly helps that we don’t have to look far to find free apps, website platforms, or even YouTube videos for learning support.
That being said, there are certain aspects of the curriculum that are less-efficiently replaced with an iPad or smartboard. When it comes to mathematics especially, concepts and questions often require the learner to demonstrate their skills and calculations, or use physical manipulations to solve problems. Grabbing a ruler, drawing a bar chart, or writing out a sum can be beyond the appropriate expectations for some learners. Whilst these skills may be supported by another individual (such as a parent or teacher), this practice falls short of providing an independent learning experience for the individual. This is where Splash City Maths proudly enters the arena…
What is Splash?
Essentially, Splash is a software package which opens up the familiar classroom stationery cupboard full of rulers, protractors and the like, and intuitively turns its contents into accessible virtual tools to be used on screen. Brilliant stuff!
Splash came into being through identifying the need for a powerful maths framework which would specifically cater to learners with a wider range of access requirements. From the introduction to simple maths at the age of four, to completing GCSEs; the aim is to support the learner throughout their educational journey.
Accessibility is where Splash comes into its own. Alongside using a computer mouse, joysticks, trackpads and keyboards, those using eye-gaze are also well and truly catered for. This is a real game changer, as it creates greater opportunities to discover maths and science regardless of disability or access requirements.
To operate Splash, you’ll need to be using a Windows computer as it is not yet available across other operating systems. Whilst a license for this software is required (starting from £90.00), Splash does offer a 30 day trial which is certainly worth investigating.
How is Splash used?
The first option is using Splash’s in-built topic groups. Here, tools purely relating to your chosen subject are shown (hiding the rest, as not to confuse.) These topic groups will vary based on the age of your learner i.e. the older the learner, the more advanced the topic group.
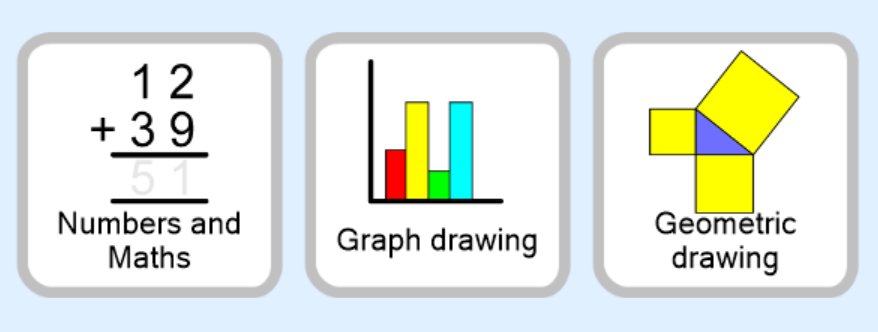
Some example Topic Groups in Splash (Junior age)
Next up are the worksheet options; both in-built and customisable. Similarly to the topic groups, Splash includes a selection of age-specific worksheets, with different activities offered across curriculum topics. If you’d rather design the worksheet yourself, a quick ‘wizard’ guides you through the process of customising your own, so you can decide on: the tools to give your learner; exactly what they see; and how you’d like the worksheet to be displayed. This can tailor a learning experience to individual goals or focuses.
Finally, we have the ability to use a pre-existing document or image as the background for a worksheet. This option is very popular amongst our teachers, as it allows the entire class to be completing the same activity. Our learner feels included with their peers, and our teacher is able to mark and oversee the same subject content – lovely!
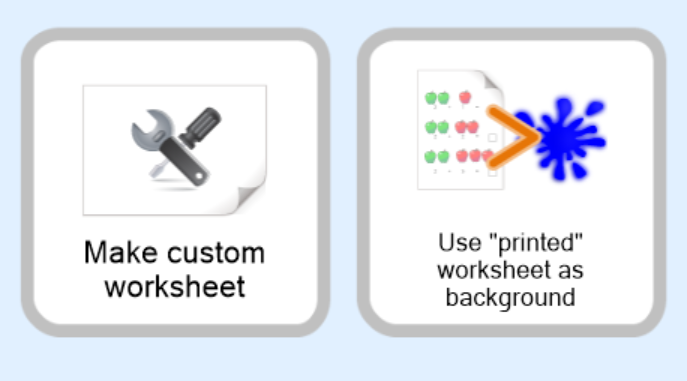
Worksheet Options in Splash; Custom or using an existing document
Tools-a-plenty!
There are tools-a-plenty in Splash, all designed to support different aspects and stages of the curriculum. The ability to hide and show these tools allows focus on the task at hand (and also curbs any temptation to explore every icon on the page!) Tools can be gradually added as the learner’s confidence in using them grows, and also as their work demands.

Pointer & “Select All”
It’s always good to have these available from the get go, giving the option to edit or move items on the page as efficiently as possible. The pointer in particular is used alongside most tools, to select and edit placement and formatting.
Typed Text

It’s always going to be helpful to add some written context to maths work, be it word problems, terminology or notes. Blocks of text can be moved around the screen, edited and formatted as you would expect from many software packages. In addition, it opens up the use of Splash for more than maths; labelling or annotating worksheets again is a popular choice amongst our teachers.
Numbers Tool
Frequently, the calculation process can be more valuable to the teacher than the answer. Splash converts common functions to icons or keyboard shortcuts, making shorthand more accessible and enabling the learner to show their “workings out” with ease. Simple keyboard shortcuts include:
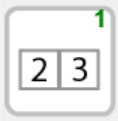
- the ‘\’ key crosses out a number, and prompts the user to add in its replacement when doing subtraction (see Example 1 below.)
- ‘;’ enables a user to carry a number across when completing an addition (Example 2).
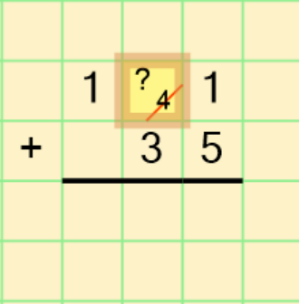
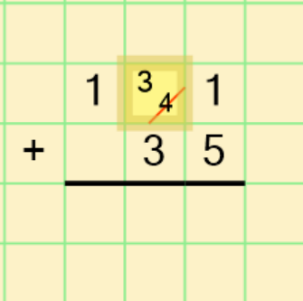
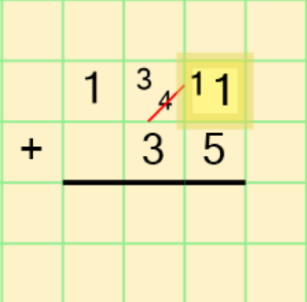
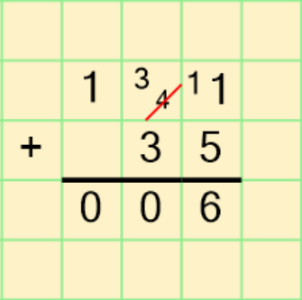
Example 1: Subtraction using the ‘Numbers’ tool in Splash
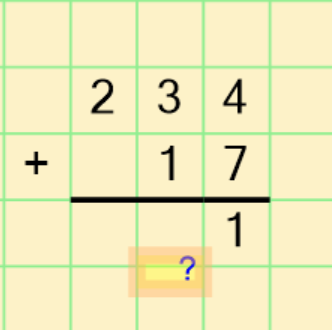
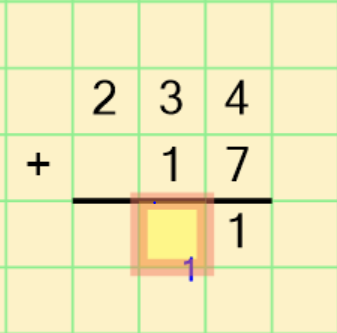

Example 2: Addition using the ‘Numbers’ tool in Splash
To assist navigation of cells when using this tool, a squared paper grid can be applied to the workspace. The learner can jump neatly between the cells using the keys or mouse. The page can also be set up to make these jumps automatically.
Starting with mastering the numbers tool really opens up the use of Splash to so many topics. Even if you’re working on shapes or graphs, the chances are some work with numbers will still be necessary, so getting things started with this tool and making it as familiar as a pen and paper will really build confidence and trust in the software.
Equations
Exactly as it says on the tin, Splash also enables the user to type equations, square numbers and cube roots by using the equations button. The thing to note here is that the equation text does not snap to the square cells in the same way the numbers do.
Top Tips for Teachers
Instead of breaking down every tool, I thought it would instead be beneficial to provide a few suggestions for early-stage implementation and use of Splash. While getting used to the overall flow of the software, hopefully these will start the ball rolling, so here are my top tips:
Worksheet templates for repeated classroom tasks – Creating an arithmetic test or multiplication table templates gives your learner a regular and consistent means to practice their skills, and means that you the teacher create one resource to carry through several weeks!
Auto-Jump cells in numbers – Often, for number work, you’re going to want to auto-jump the cell from left to right, and sometimes vice versa. Being mindful of this will save your learner a lot of inputting effort in the long run. I can’t emphasise enough the benefits of this tool.
Drag & Drop – This tool enables greater accuracy with object placement, and again reduces the energy output to complete these tasks. For example, simply click to begin the movement of some text or a shape, and click again once it has been moved to the new / end location.
Creating Custom Worksheets as A4 – The handy wizard guides you through creating a custom worksheet, and my biggest tip here is to select the ‘A4 Document’ option on the first page of choices (not the default). Saving, exporting and printing off work becomes way more straight forward if you regularly select this option, so it is worth making it a habit.
Preview ‘User Mode’ – When in teacher mode on Splash, it’s a good idea to hop back to your user mode from time to time. This enables you to view your worksheets exactly as your learner would, helping to keep things focussed, and on task.
Pros and Cons
For school access, the major pro is that Splash does offer the ability to create multiple learner profiles. Each profile can have its own settings, worksheets and topic groups, so while your license details may vary, there’s no need to have multiple copies of the software itself. That being said, the con is not being able to access these profiles from a different location or device via a cloud database. Having an identical profile at both home and school for example would really help in supporting independent learning, but this is not currently a feature of Splash. Similarly, you do need to have Splash to view Splash files, as they won’t convert to anything else on a Windows device. You can export a final worksheet as a PDF, however, editing is only achievable via Splash itself.
Being so customisable has lead to a lot of settings, modes and visual elements, which is both a pro as well as a con. Though being slightly overwhelming at the start, having so many functions is an intentional choice. The software developers’ aim is for the software to be as customisable as possible, in order to tailor the learning experience to the individual needs of each learner. It may take a little time to familiarise yourself with the various tools and components, but it’s worth it in the end.
Splash provides access to some of the more ‘hands-on’ skills within maths that I am yet to see in any other software package. Combined with the consideration of such a variety of access methods, it offers a highly customisable workspace which can be offered to so many learners.
And there we have it! A very brief introduction to what is a mammoth software package! While it can be easier said than done, I really urge you to approach Splash with confidence, and try-out the tools, settings and options within, as they can really unlock so much potential in our learners.
Splashing stuff!