On this month’s topic of ‘innovation’ I want to share with you a few examples of making use of a particular piece of equipment to access or control another. This type of innovation has proved invaluable for so many of the guys we work with as it taps into the ‘thing’ they’re already really good at — be that an access method, the navigation of a particular device or their knowledge of the nuances of a specific software title — and allows them to utilise that in their use of or access to something new or something which has proved difficult for them to use in the conventional way. Within this post, I will endeavour to be concise and keep the information relevant and easy to digest. That being said, this was meant to be an introductory sentence…
Typing with your talker
The first example I’d like to share is really complicated to explain in terms of ‘how it works’ so, in the interest of being succinct, I won’t (much). We have a number of communication aid users — Grid 3 users specifically — who attend mainstream schools, all of whom have come up against the issue of producing extended writing. Their access to a standard keyboard for typing is such that it is not a viable option for the creation of work so instead they must rely upon their use of their talkers via EyeGaze or switch scanning. They are able to create the content using their respective vocab packages, chatting away within their chat bar but come unstuck when it comes to capturing this within one complete piece of work. I must mention at this point, the Nuvoice software on an Accent device does this amazingly well either via a USB cable or the liberator bluetooth dongle whereby you can create your sentences on your talker and output them externally to a separate device thus creating your extended writing. A simple ‘output on/off’ cell allows you to switch between talking and typing making this solution, as far as I’m concerned, what all other communication aids should aspire to. So if you have an Accent device, you can skip the rest of this paragraph.
There are a few ‘out of the box’ solutions for Grid 3 which, up to a point, work absolutely fine. There are Gridsets available that allow you to output text within the device itself with some clever programme switching and copy and paste commands to your word processor of choice, so you produce the text in the same way as you would for verbal communication then copy and paste it into MS Word which is running in the background. The main issue we have found with this is that it doesn’t allow the user to view their work side by side with their vocab package which means they are unable to constantly review as they work and whilst you could feasibly switch between the two relatively quickly using a computer control grid, it gets a bit faffy jumping about on the screen.
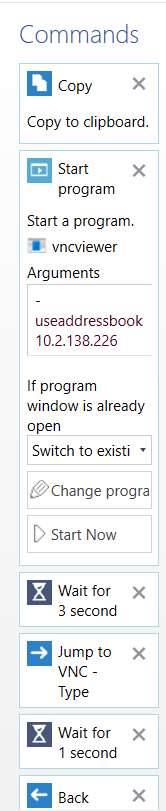
The solution we have devised for this involves using a separate laptop or tablet with the word processing software running (I have used it with Clicker 7, SymWriter and Word) the free Tight VNC software on both the communication aid and laptop and an actual labyrinth of commands and rapid jumps back and forth between Gridsets that happen automatically and almost imperceptibly— if you want to know the ins and outs of all of this bit, do feel free to ask. The outcome being that the user plays to their strength of creating the content, be that with symbol support, pre-loaded phrases, predictive text etc. (not to mention doing so with the device with which they are most familiar using the access method they use all the time) and then activates a single cell which generally just says ‘type’ or ‘write’ or ‘send’ and by some AT magic, the text appears on the second device.
This allows the user to create their writing one word or sentence at a time if needs be whilst constantly being able to re-read their work and discuss it before continuing. The externally presented piece of work can then be drafted over a number of days if required, can be saved and printed in the same way as it would be by any other laptop user and, crucially, frees up some thinking space on the communication aid.
Mirroring the Interactive Whiteboard
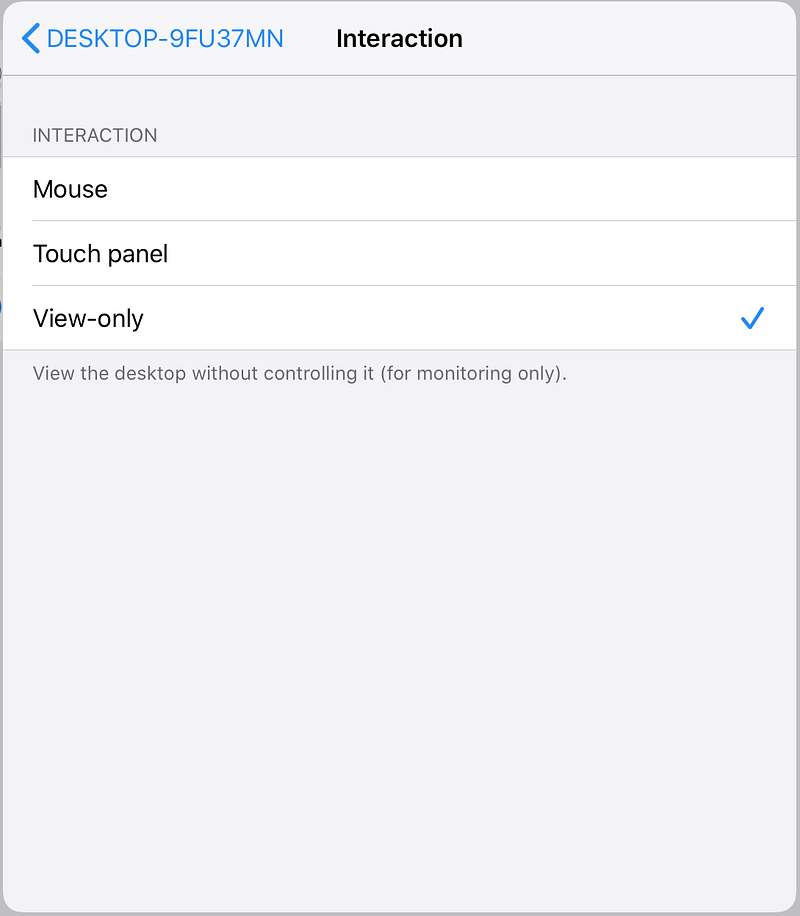
The next innovative use of tech is also something we’ve put in place in a number of schools. It also makes use of VNC (in most cases) and allows the user to mirror the teaching display in the classroom on an iPad. Whilst also being quite a cool thing to do, this is useful for those who have difficulty with vision, visual processing, working memory or concentration. Once the VNC server is installed on the teaching device (usually the teacher’s laptop at the front of the class) and incoming connections are enabled, all you need is the free VNC Viewer app for iOS and the IP address of the laptop and you’re good to go. It is important to note that this gives the iPad full control over the remote device unless you opt out, which I suspect you will want to do. It’s as simple as selecting ‘interaction’ and choosing ‘view-only’ on the home page of the app to prevent accidental (or otherwise) interactions with the device by the user.
Essentially, this solution allows you to access the teaching materials from wherever you are in the room so gone are the days of a student having to sit front and centre at all times otherwise they can’t see the board. It can also be used outside of the classroom as it is connected via the school’s WiFi which allows the user to access the teaching materials in a different environment should they need to. Beyond the physical viewing of the material itself, this is useful to those who find it difficult to retain information in the process of looking from the board back down to their work as the ‘tracking’ required by the user can be minimised i.e. the book and the screen side by side.
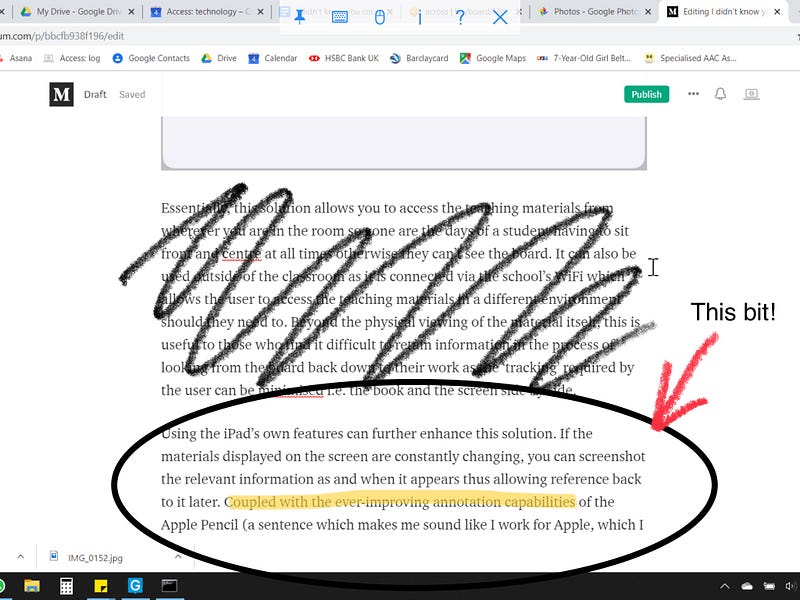
Using the iPad’s own features can further enhance this solution. If the materials displayed on the screen are constantly changing, you can screenshot the relevant information as and when it appears thus allowing reference back to it later. Coupled with the ever-improving annotation capabilities of the Apple Pencil (a sentence which makes me sound like I work for Apple, which I don’t…), the user can highlight certain elements, make notes or crop out unnecessary information thus making it easier to access.
A rather crude example for you here…
You can also use the iPad accessibility features to tailor the viewing experience using coloured overlays or the zoom function depending on the need of the user.
As with the typing solution above, this is not always necessary depending upon the setup your school has. The newer Smart Boards have the functionality to be mirrored on their own app which does much of the same as well as allowing the iPad to be mirrored back to the board. The advantage of the VNC way of working, however, is that it is not dependent on the ‘right board’ to make it work — it could even be used in a presentation scenario whereby a laptop is being projected onto a wall or drop-down screen, this means it isn’t only a solution for a classroom environment but is usable in an assembly or beyond school in meetings and conferences.
Across Center
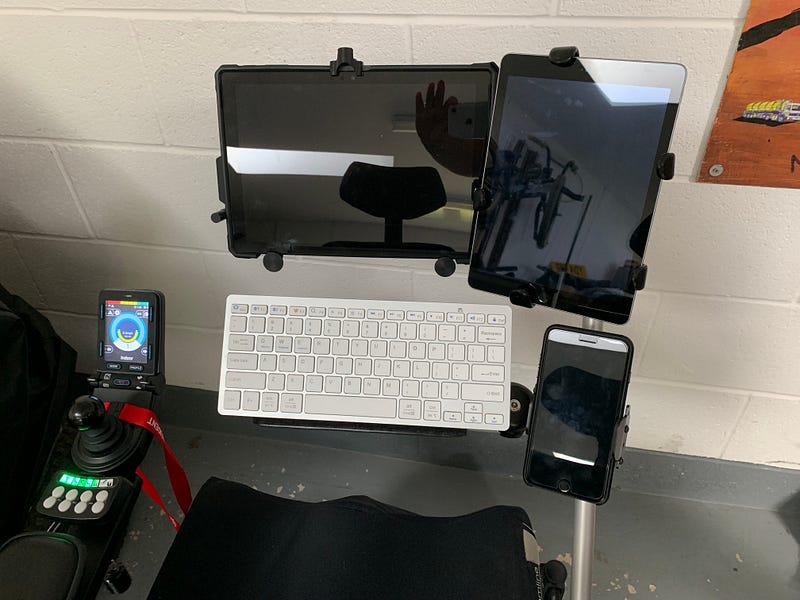
The final example I’d like to share isn’t especially ground-breaking in terms of the technology involved or what that technology is doing. The innovative aspect of this one is more in the way it is deployed and the potential it has for improving the experience of the user. It is a piece of software called Across Center, which makes use of the Bluetooth capabilities of all of your devices to centralise their control to one place. It basically transforms your laptop/PC’s keyboard and mouse into a Bluetooth keyboard and mouse for use on your phones, tablets, other PCs etc. As I said, Bluetooth input devices, nothing really to write home about. The big thing for this one is the ability to switch between the devices with a single hotkey press or mouse-button click, copy and paste between those devices and drag items from one to the other. I mentioned earlier the importance of tapping into a users existing strengths and abilities and applying them to different contexts — that is precisely what this one does. Since the introduction of assistive touch cursor control on iOS, this solution allows us to use our normal mouse/keyboard/joystick that we use day-to-day on our ‘main’ device, and apply them straight to the control of iPads and iPhones with no change in position or swapping round of equipment required.
This is a great example of one of our clients’ set up which achieves this really well. The additional benefit of this one is that it also makes use of the Bluetooth module built into his power chair control, meaning he can use one joystick for four different purposes.
Honourable mention for Communication Aids and Smart Speakers
I can’t leave a post about controlling one thing with another without a quick mention for communication aids as a means of accessing smart speakers and the myriad of environmental controls they offer. If you have worked with us before, you’ll know this is something we absolutely love as a concept and will talk about, invited or not, for as long as we’re allowed. With the introduction of a £20 smart speaker and a bit of Smart home tech you can talk, using your talker, to turn on the lights, music, TV, central heating, open your blinds, check who’s at the door and all sorts of other cool things — it’s amazing!
Ready to explore how assistive technology can help?
Our team of experts is here to provide personalised advice and solutions. Contact us today for a friendly, no-obligation discussion about your needs.